
Direct: 1-800-220-0779
Puerto Rico Toll-Free: 1-855-823-8056
AT&T Forms - How to Create Custom Forms
FC Forms give you the ability to create custom forms. These forms can then be dispatched to a user, and viewed from the administrative portal and mobile application.
There are two types of forms you can create and customize. You can create your own form or you can use a pre built form from our forms library and customize it to suite your business needs.
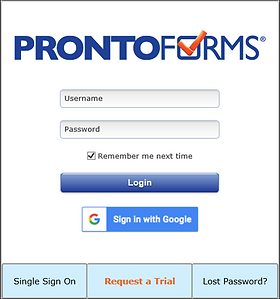
Login to Pronto Forms Application
-
From your desktop or mobile device go to: https://live.prontoforms.com/security/login
-
On the Login screen in the Username field, type your Username
-
In the Password field, type your password information
-
Click the Login button

Creating and Naming Your Form
-
On the Manage Forms tab, select Create New Form from the menu

Creating a Form from the Forms Library
-
Click Select a Form from our Forms Library on the pop-up window
-
Form Options include:
-
Create a Version 2 Form: This Form Builder enables you to create and customize your own form
-
Select a Form from our Forms Library: This enables you to choose a fully functional pre built form from our Forms Library and customize it
-
First we will discuss choosing a form from our Forms Library.
-

Viewing the Forms Library
Select an Industry or Business Function from the dropdown menus at the top of the screen.
-
The Forms Library consists of pre-built, ready to use forms.
-
Hundreds of common forms are available, categorized by Industry and Business Function for easy searching.
Create your own form using the "Create a Version 2 Form" option

Creating and Naming Your Form
-
Once the form builder has loaded, you’ll be navigated to the "Form Information" screen
-
Give your form a Form Name and Form Description
-
Click the Save button
-
You will be able to edit this later if desired.
-

Viewing the Main Form Screen
-
Next, you will be navigated to the Form Builder Screen.
-
Here, you can add pages in the page index to the left, and add sections and questions on the right.
-
A Page is equivalent to a screen on a mobile device. If the page is long, mobile users will scroll down to see more. They can also swipe sideways to navigate between multiple pages.
-
A Section creates sub headers within a page, and they organize questions into logical groups. Each page must have at least one section.
-
Questions require users to specify different kinds of information. Each section must have at least one question.
-
For example, you can provide questions you would like the resource to ask the customer while on the job site.

Adding a Page
-
Click the Add a Page button
-
Pages are displayed on the left side of the Form Builder.

-
On the Page Information screen, give your page a name, and a custom unique identifier
-
The Page Information screen allows you to name your page and create a custom unique identifier for your page.
-
The custom unique identifier can act as an option for searching or making edits later on in the application.

-
Optionally, from the insert page dropdown menu, select where the page should be placed in your form
-
Click the Save button.
-
By default, new pages are inserted at the end of the current page listing.

Adding a Section
Sections are logical divisions on a single page, making it easier for your mobile users to navigate through forms. They contain questions within them.
-
Click the desired page on the left panel
-
Click the Add a Section button on the right panel

Selecting a Section Type
Choose a Section Type, for this example we will choose Regular. Section Type options include:
-
Regular: Logically group questions under a sub header on a form page
-
Repeatable: Allow entering multiple line items for the same set of questions on a page

Naming a Section
-
On the Section Information screen under General Information, give your section a name, and a custom Unique Identifier

Adding a Question
-
Click Add a Question on the right pane, inside of the desired section

-
Select your Question Type
-
On the Question Settings screen, fill out the Question Text and if needed a custom Unique Identifier
-
Configure other settings as necessary. The options will differ based on the type of question you choose
-
Click Save to return to the Main Form Display screen

Saving the Form
Once you have finished creating your form, there are two options on saving it. These options can be found at the top right of the form builder screen:
-
Save as Draft: Saves the current form as a draft, Drafts are not deployed to users with standard “Can Submit” permissions
-
Save and Deploy: Saves the form as an Active version and deploys it to mobile devices. Save and deploy is typically used only when a form has been completed and is ready to be deployed to end users. This option will not be available if there is an error in your form.